Jan 12, 2025

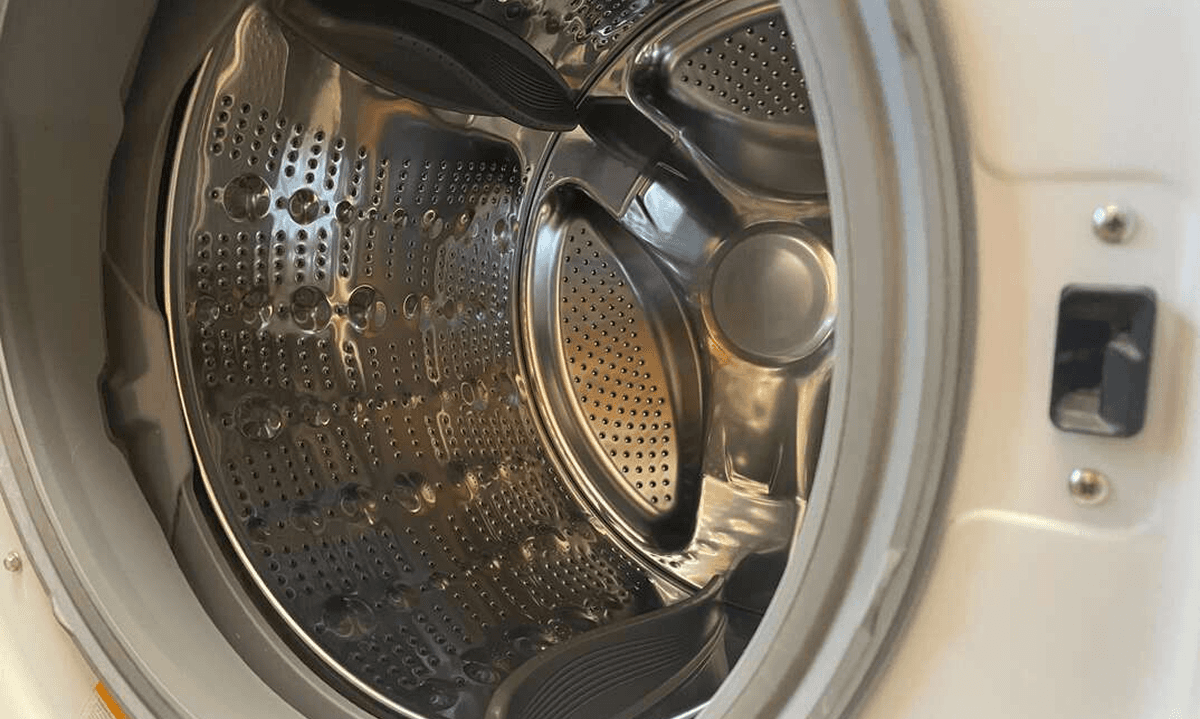
Why Your Front-Loading Washing Machine Stinks — and How to Clear Up the Smell

An example of a clean washing machine drum

An example of a clean washing machine drum

An example of a clean washing machine drum

An example of a clean washing machine drum

Ahhh. There’s nothing like the smell of clean, freshly laundered clothing. But when a whiff of something stinky emanates from your front-loading washing machine each time you open the door, it can make you seriously wonder about the cleanliness of your clothing.

Front-loaders are designed to be energy-efficient and use less water, but that design also traps moisture. Over time, leftover soap, dirt, and lint create the perfect environment for mold and bacteria to grow.

And let’s be honest. You're washing your clothes because they are dirty and smelly.

Getting rid of that smell is easier than you think — and with a few simple habits, you can keep your washing machine smelling fresh for good. Here’s the why and advice on how to fix it.

5 Reasons for a Smelly Washing Machine

1. Mold and Mildew Buildup

One of the most common reasons for a bad smell is mold and mildew growing inside the washer. These can form in damp, dark areas like the rubber door seal or detergent drawer. If not cleaned regularly, they create a musty odor that spreads to your laundry.

Leaving the door closed after a wash also traps moisture inside, which helps mold grow faster. To prevent this, keep the door slightly open between washes and wipe the seal dry after each use.

2. Detergent and Fabric Softener Residue

Using too much detergent or fabric softener can cause buildup over time. When residue mixes with dirt and lint, it forms a sticky layer that bacteria love. This buildup often hides behind the drum or inside hoses where you can’t see it.

Running a hot wash cycle with a cleaner or vinegar once a month helps break down residue. Also, try using high-efficiency (HE) detergent if your machine requires it—it produces fewer suds and rinses out better.

3. Clogged Drain or Filter

A clogged drain or filter can trap lint, hair, and small debris that start to rot and smell. If you notice a foul odor even after cleaning the drum, the drain filter may be the problem.

Check your manual to find where the filter is and clean it every few months. You’ll likely find lint or small items caught there that are causing the odor.

4. Standing Water in the Drum

Sometimes, a washing machine doesn’t drain fully, leaving small amounts of water at the bottom. This standing water becomes stale and smelly over time. You might notice the odor most when you open the lid or door after a few days.

Make sure the drain hose isn’t kinked or blocked and that the pump is working correctly. If the problem continues, it may need a professional check-up.

5. Dirty Door Seal

The rubber seal around the door collects soap scum, hair, and dirt every time you do laundry. Over time, this area becomes a breeding ground for bacteria and mold.

Make sure the Wipe it regularly with a damp cloth and a mix of vinegar and water. For stubborn grime, use a small brush to get into the folds of the seal.hose isn’t kinked or blocked and that the pump is working correctly. If the problem continues, it may need a professional check-up.


How to Clean a Smelly Washing Machine With Basic Home Supplies?

Getting rid of that funky washing machine smell can easily be done with products you already have in your home.

Things You’ll Need :

  • Baking soda

  • White vinegar

  • Sponge

  • Small brush, such as an old toothbrush

Step-by-step Guide to Clean Washing Machine With Baking Soda and Vinegar

Step 1: Prepare the Cleaning Solution
Combine one-quarter cup baking soda and one-quarter cup water and pour it into the machine’s detergent container.

Step 2: Add Vinegar
Pour two cups of white vinegar directly into your washing machine.

Step 3: Wash
Run a high-heat washing cycle.

Step 4: Prepare a Second Cleaning Solution
Mix one part water and one part vinegar in a small bucket or large bowl.

Step 5: Clean the Machine’s Interior
When the washing cycle is done, use the vinegar solution and the sponge to tackle any mold or mildew spots in the machine, around the door and especially under the rubber gasket.

Step 6: Clean the Detergent Tray
Remove the detergent tray and give it a clean. Use the vinegar solution to sponge it down, and use the brush to get into any small corners to thoroughly remove any mildew.

Step 7: Check the Drain
Pour boiling water down the drain to dissolve anything blocking it. You can also purchase commercial unclogging products if a blocked drain seems to be the cause of your smell.

Step 8: Clean Your Filter
Remove the filter, empty it of debris and wipe it with soapy water. Let it dry and replace it.

Step 9: Dry
Some front-loading washing machines have a cleaning cycle. This can be called different things by different manufacturers. Check your owner’s manual to see if your device has a cleaning cycle and how to run it. If there are recommended intervals to do a cleaning cycle, follow them.

How to Keep Your Washing Machine Fresh All the Time?

Leave the Door and Drawer Open

After each wash, leave the door slightly open to let air flow. This helps dry the drum and stops mold.

Pull out the detergent drawer so it can dry too. Moisture is the main cause of musty smells.

Wipe the Seal and Surfaces

After laundry day, wipe the rubber door seal with a dry cloth. Get into the folds where lint and water hide.

Clean the inside of the door and the drum rim as well. A quick wipe keeps bacteria from growing.

Run a Monthly Cleaning Cycle

Once a month, run a hot empty cycle. Add a cup of white vinegar or a washer cleaner.

This breaks down soap scum and kills odor-causing germs. It also helps hoses stay clear.

Use the Right Detergent (and Less of It)

Follow the dosing lines on your detergent cap. Too much soap leaves residue that traps smells.

If you have an HE machine, use HE detergent. It makes fewer suds and rinses cleaner.

Empty the Washer Promptly

Take clothes out as soon as the cycle ends. Wet laundry left in the drum will sour fast.

If a delay is unavoidable, run a short rinse again. This refreshes the load and the drum.

Clean the Drain Filter and Pump Area

Check your manual and clean the drain filter every few months. Lint, hair, and coins can hide there.

A clogged filter can leave standing water that smells. Keeping it clear improves drainage and freshness.

Keep the Area Around the Washer Dry

Wipe up spills and splashes on the floor. Humid corners invite mildew.

If the room is damp, use a small fan or dehumidifier. A dry laundry area helps a fresh machine.

Recent Posts

Recent Posts

Recent Posts

Essential manuals guide homeowners in appliance repairs.

Jul 12, 2025

5 Common Mistakes with New Appliance: A Guide for Homeowners

5 Common Mistakes with New Appliance: A Guide for Homeowners

5 Common Mistakes with New Appliance: A Guide for Homeowners

Linkny homeowners accidentally shorten their appliance’s lifespan simply by skipping key steps in setup and maintenance. To help you get the most out of your investment, here are the five most common mistakes people make with new appliances — and how to avoid them.

1. Ignoring the Manufacturer’s Instructions

It sounds obvious, but skipping the manual is one of the biggest mistakes homeowners make. Modern appliances come with advanced features, energy-saving settings, and specific installation requirements.

Failing to follow those directions can cause poor performance, void the warranty, or even create safety hazards. For example, some refrigerators need to stand upright for 24 hours before being plugged in, while new washers may require removing shipping bolts before use.

Tip: Always keep the instruction booklet handy or bookmark the digital copy online. It can save you time — and prevent costly service calls later.

2. Poor Installation or Leveling

Many appliances — especially washers, dryers, and refrigerators — need to be perfectly level to work properly. When installed on uneven floors, they can shake, leak, or make loud noises.

DIY installations often overlook proper leveling or water line connections. A tilted washer can wear out bearings, and a crooked fridge door may not seal tightly, wasting energy.

If you’re unsure about setup, hire a certified technician. Professional installation ensures your appliance is connected correctly, balanced, and ready for long-term use.

3. Overloading or Misusing the Appliance

Just because a washer or dishwasher looks spacious doesn’t mean it can handle everything you throw at it. Overloading limits water and airflow, leaving clothes or dishes half-clean and straining the motor.

Similarly, using an appliance for the wrong purpose — like washing heavy rugs in a standard machine or drying shoes in a clothes dryer — can cause internal damage.

Always check the manufacturer’s capacity guidelines. When in doubt, less is more. Running smaller, balanced loads helps your appliance clean better and last longer.

4. Skipping Regular Cleaning and Maintenance

Even brand-new appliances need regular care. Food particles, lint, and detergent residue build up over time and affect performance. A neglected dishwasher or washing machine can develop odors or mold within weeks.

Simple cleaning habits make a big difference:

  • Wipe refrigerator door seals weekly to keep them airtight.

  • Clean your dishwasher filter every month.

  • Empty the dryer lint trap after every use.

  • Run a cleaning cycle on your washer with vinegar or baking soda once a month.

These small steps prevent breakdowns and keep your appliances working efficiently year-round.

5. Not Registering the Warranty

Most new appliances come with a manufacturer’s warranty, but many homeowners forget to register it. Without registration, you might miss out on free repairs, recall alerts, or extended coverage options.

It only takes a few minutes to register online using the model and serial number. Doing this ensures that if something goes wrong, your warranty is active and your claim will be processed quickly.

Bonus: Some manufacturers offer bonus perks, such as free maintenance reminders or product updates, when you register your appliance.

How to Make Your Appliances Last Longer?

If you’ve just purchased a new appliance, follow these extra tips to protect your investment:

  • Use the right products. Choose HE detergent for high-efficiency washers and manufacturer-approved filters or cleaning agents.

  • Watch your home’s power supply. Sudden voltage spikes can harm sensitive components. A surge protector is an inexpensive safeguard.

  • Don’t ignore warning signs. Strange noises, poor performance, or leaks mean something needs attention — call a professional before it gets worse.

  • Schedule routine inspections. Even once a year, a professional checkup can extend appliance life and catch hidden issues early.

A certified technician diagnosing a washing machine issue.

Jun 7, 2025

5 Reasons Why You Should Choose Professional Appliance Repair Services Over DIY Repairs: A Homeowner's Guide

5 Reasons Why You Should Choose Professional Appliance Repair Services Over DIY Repairs: A Homeowner's Guide

5 Reasons Why You Should Choose Professional Appliance Repair Services Over DIY Repairs: A Homeowner's Guide

When your dishwasher stops draining or your dryer won’t heat, it’s tempting to grab a screwdriver and try to fix it yourself. After all, there are hundreds of “how-to” videos online. But while DIY appliance repair might seem cheaper at first, it often ends up costing you more in the long run.

Here’s why hiring a professional appliance repair service is the smarter, safer, and more reliable choice for every homeowner.

1. Professionals Know What They’re Doing

Appliance repair technicians aren’t just “handy.” They’re trained experts who understand how every component works — from electrical wiring to water pumps and control boards.

Modern appliances are complex machines. A small mistake in a DIY attempt can lead to bigger damage or safety risks. A certified technician can diagnose the real problem quickly and fix it correctly the first time.

Pro tip: When choosing a repair company, look for technicians certified by manufacturers or accredited programs. This ensures they’re trained to handle your specific brand.

2. Safety Comes First

DIY repairs can be risky. Appliances use electricity, gas, and water — a dangerous combination if you don’t have the right tools or experience. One wrong move could cause electrical shocks, leaks, or even fires.

Professional technicians know how to handle these hazards safely. They follow safety protocols, use insulated tools, and carry insurance in case anything goes wrong.

Your safety — and your home’s — is worth far more than saving a few dollars on a repair bill.

3. It Saves You Time (and Stress)

Let’s be honest — most DIY repairs take longer than expected. You have to watch tutorials, buy the right tools, figure out disassembly, and hope you can put it all back together. Meanwhile, your appliance is still broken.

A professional, on the other hand, can usually diagnose and fix the problem in one visit. They’ve seen the issue hundreds of times before and come prepared with the right parts.

Instead of spending your weekend knee-deep in wires and frustration, you can relax knowing the job will be done right — and fast.

4. Long-Term Cost Savings

DIY repairs may seem cheaper upfront, but small mistakes can lead to expensive future damage. Miswiring, over-tightening, or using the wrong replacement part can cause new issues that void your warranty or require full replacement later.

Professional repairs might cost a little more initially, but they save money in the long run. You’ll get lasting results, guaranteed parts, and work that keeps your appliance running efficiently for years.

Quick fact: Many reputable repair companies credit your diagnostic fee toward the total repair cost if you choose to hire them.

5. Warranty Protection and Peace of Mind

Most manufacturers’ warranties require repairs to be done by licensed professionals. If you attempt a DIY fix, you could void your appliance’s warranty — meaning you’ll pay out of pocket for any future issues.

Professional repair services not only protect your warranty but also offer their own guarantees on parts and labor. If something goes wrong after the repair, they’ll come back to fix it at no extra charge.

That peace of mind is something no YouTube tutorial can offer.

When to Call a Professional?

If your appliance shows any of these signs, it’s best to call a qualified technician:

  • Unusual smells (burning, gas, or electrical)

  • Strange noises or vibrations

  • Leaking water or refrigerant

  • Appliance won’t start or shuts off mid-cycle

  • Lights flicker or circuit breaker trips

Professionals have the diagnostic tools to find the exact issue — not just guess based on symptoms.


A certified technician diagnosing a washing machine issue.

May 12, 2025

10 Essential Traits You Should Look for When Hiring an Appliance Repair Company Near You

10 Essential Traits You Should Look for When Hiring an Appliance Repair Company Near You

10 Essential Traits You Should Look for When Hiring an Appliance Repair Company Near You

When your refrigerator stops cooling or your washer won’t spin, you don’t have time to gamble on the wrong technician. Hiring the right appliance repair company can save you money, stress, and repeat breakdowns. But with so many options out there, how do you know which one to trust?

Here are 10 essential traits to look for before you book your next appliance repair service.

1. Proper Licensing and Certification

Always start by checking credentials. A reliable appliance repair company should hold the necessary licenses and certifications for your state or region.

This ensures that technicians are trained, insured, and meet safety and performance standards. Ask for proof — reputable companies are happy to show it.

⭐️ At Fred’s Appliance, all our technicians are certified and insured.

2. Experience With Multiple Appliance Brands

Not all appliances are built the same. A good repair company should have hands-on experience with a variety of brands and models — from Whirlpool and LG to Samsung and Bosch.

Technicians familiar with different manufacturers can diagnose problems faster and fix them correctly the first time.

Pro tip: Visit the company’s website to see if they list your appliance brand under their service expertise. If you check our home page, you’ll notice that at Fred’s Appliance our technicians are trained for almost all brands.

3. Transparent Pricing

No one likes hidden fees. Choose a repair service that offers clear, upfront pricing before the work begins.

Ask if they charge a diagnostic fee and whether it’s credited toward the repair if you hire them. Honesty about costs builds trust and helps you avoid surprises later.

For example, at Fred’s Appliance, our service call is $59 which covers inspection and diagnosis, even if a repair isn’t needed.

4. Positive Local Reviews and Reputation

Search for the company on Google, Yelp, or Thumbtack. Read what real customers say about their experiences.

Look for patterns: consistent five-star reviews, mentions of professionalism, and quick service are strong indicators you’re in good hands.

Tip: A few bad reviews aren’t a deal-breaker — but repeated complaints about the same issue should raise a red flag.

5. Same-Day or Fast Service Availability

When your fridge breaks down, you can’t wait a week. The best appliance repair companies offer same-day or next-day appointments for urgent issues.

Quick response times show reliability and respect for your time — especially for essential appliances like refrigerators, ovens, and washers.

6. Warranties on Parts and Labor

A trustworthy repair service stands by its work. Look for companies that provide warranties on both parts and labor.

This gives you peace of mind knowing that if something goes wrong after the repair, you’re covered without extra cost.

7. Professionalism and Communication

From your first call to the final repair, the company’s communication style says a lot. A reliable service will confirm appointments, arrive on time, and explain the issue clearly.

You should never feel rushed or confused about what’s being done. Professionalism goes hand-in-hand with good customer service.

8. Well-Equipped and Trained Technicians

An expert technician should arrive prepared — with tools, parts, and the knowledge to fix most problems on the first visit.

Companies that invest in ongoing training ensure their technicians stay up to date with new appliance technology and diagnostic tools.

Hint: Ask if their technicians are factory-trained or certified by major manufacturers.

9. Local Presence and Community Trust

Hiring a local appliance repair company often means faster service and better accountability. Local technicians understand the community, rely on repeat customers, and are more motivated to maintain a strong reputation.

Plus, choosing local helps support small businesses in your area.

10. Clear Service Guarantee and Follow-Up

A good repair company doesn’t disappear after the job. They’ll follow up to ensure your appliance is working properly and that you’re satisfied.

Look for companies that offer a service guarantee — a promise to make things right if the issue isn’t fully resolved.

Signs You’ve Found the Right Company

  • They answer calls promptly and schedule service quickly.

  • Technicians arrive in uniform and respect your home.

  • They explain your options and give honest recommendations.

  • Reviews mention long-term reliability and repeat customers.

If a company checks most of these boxes, you’ve likely found a repair partner you can trust for years to come.

Call Now to speak directly with a technician, or book online in 1 minute.

Our certified technicians provide same-day appliance repair across North Carolina’s - Charlotte to Raleigh, Durham, Cary, Concord, and surrounding areas.
✓ $59 service call covers inspection and diagnosis, even if a repair isn’t needed.

4.8/5 based on 500+ reviews

52 appliance repairs in your nearby area booked this week

Call Now to speak directly with a technician, or book online in 1 minute.

Our certified technicians provide same-day appliance repair across North Carolina’s - Charlotte to Raleigh, Durham, Cary, Concord, and surrounding areas.

✓ $59 service call covers inspection and diagnosis, even if a repair isn’t needed.

4.8/5 based on 500+ reviews

52 appliance repairs in your nearby area booked this week

Fred’s Appliance Repair

Our Fred's Appliance Repair, your local team of trusted experts in home appliance repair!

Google Verified

This business has been verified by Google.

Top Pro on Thumbtack

This business has been recognized as a Top Pro on Thumbtack in 2023, 2024, and 2025.

Super Pro on Housecall Pro

This business has been recognized as a Superpro on Housecall Pro in 2025.

Contacts

Phone Number:

Office Address:

245 Joshua Glen Lane, Cary, NC 27519

Operating Hours:

Monday - Saturday: 6:00 AM - 8:00 PM

Sunday: 6:00 AM - 4:00 PM

© 2025. Fred’s Appliance Repair LLC. All Rights Reserved.

License Number: JnCvlsLnth