
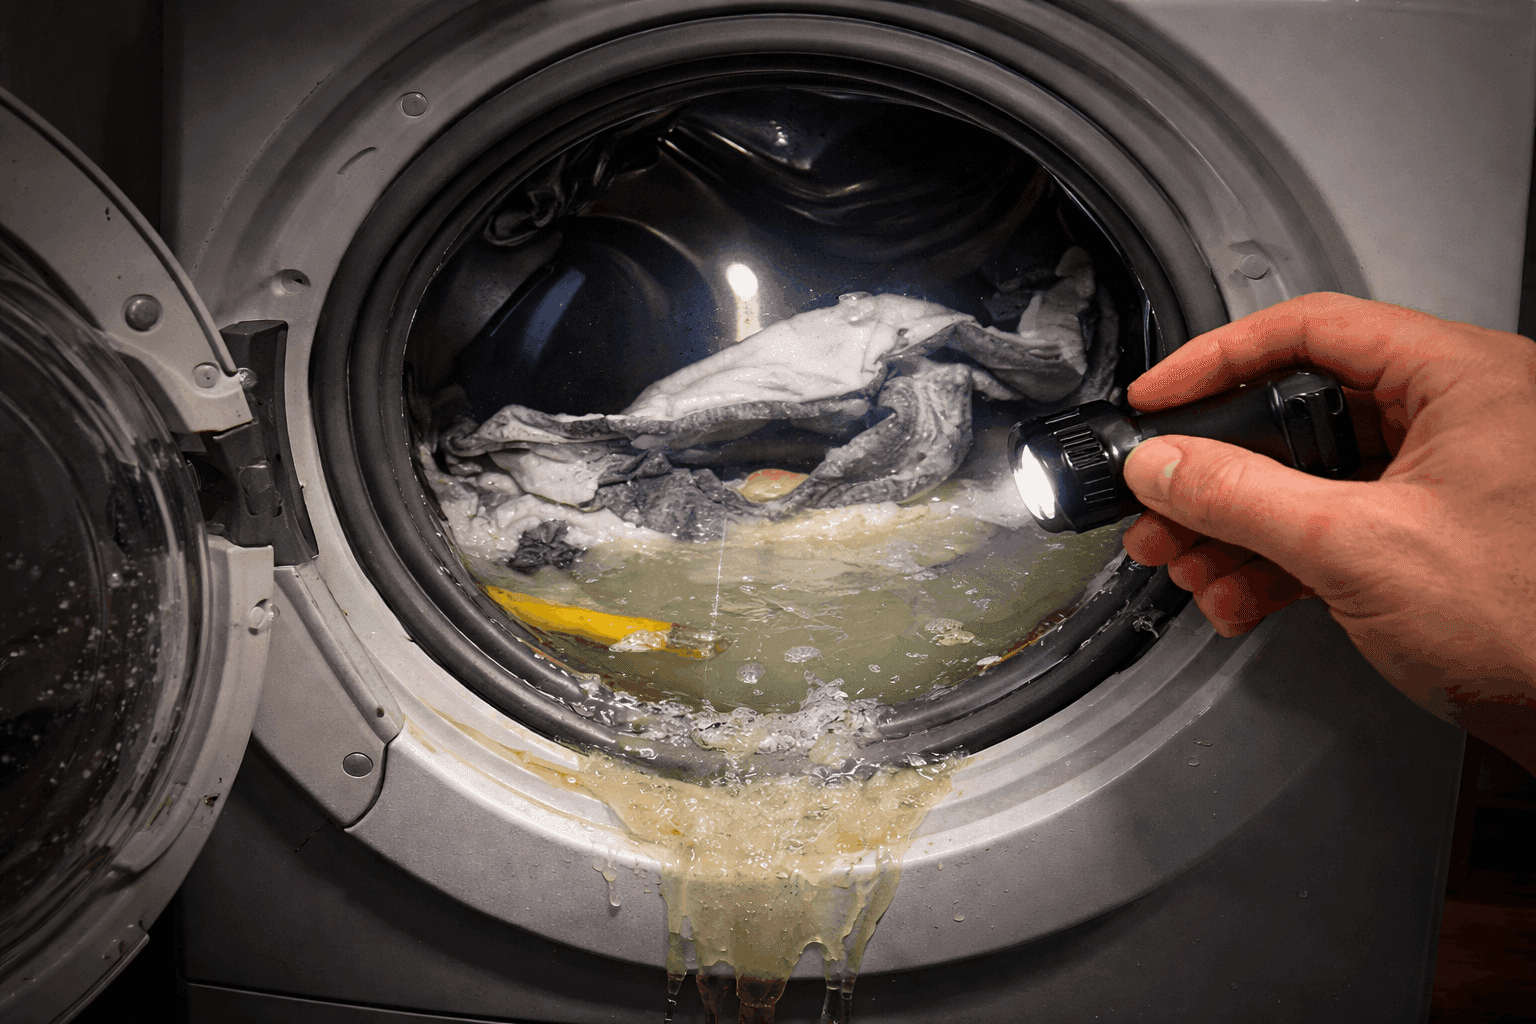
Washing Machine Won’t Drain: Causes, Symptoms, and How to Fix
A fridge water dispenser that slows to a trickle or stops completely is one of those small annoyances that somehow feels massive at 7 a.m.
The good news: most cases come down to a handful of causes, and you can sort them out yourself in under an hour.
Work through these in order. The fixes at the top take 30 seconds; the ones at the bottom take a bit more effort.
Unplug the Fridge and Close the Water Valve Before You Start
If you need to inspect electrical parts or disconnect water lines, unplug the fridge first. For anything involving the water connection itself, close the shut-off valve behind the fridge (or under a nearby sink). A screwdriver, a multimeter, and a bucket will cover most of what you might need.
3 Settings That Accidentally Disable the Dispenser
Child Lock Is On — Hold the Lock Button for 3 Seconds
Most modern fridges have a child lock or dispenser lock feature. It's easy to enable by accident. Check your control panel for a "Lock" indicator — if it's lit, hold the button for about three seconds to turn it off. Your manual will confirm the exact button combination for your model.
The Door Switch Has Failed and the Fridge Thinks the Door Is Open
The dispenser won't work if the fridge thinks the door is open — and the door switch can fail even when the door looks shut. If your interior light stays on after you close the door, or pressing the door button manually doesn't turn it off, that switch is the problem.
The Shut-Off Valve Behind the Fridge Is Partially Closed
If you recently moved the fridge or had any plumbing work done, double-check that the water supply valve behind the unit is fully open. Even a quarter-turn restriction can noticeably slow down the dispenser.
The Filter Is Clogged — Replace It and Test With the Bypass Plug
A clogged water filter is the single most common cause of slow or stopped water flow. Filters catch sediment and contaminants over time, and eventually they restrict flow so much that almost nothing gets through.
Replace your filter every six months. If you live somewhere with hard water or heavy sediment, you might need to do it sooner. Signs it's time: a "replace filter" light, water that tastes off, or noticeably weak flow.
Not sure if the filter is the culprit? Many fridges (GE models in particular) come with a bypass plug. Pull the filter out, install the plug, and test the dispenser. If the flow jumps back to normal, the filter was the problem.
One more thing: make sure the new filter is fully seated. Most filters need a firm twist until you feel or hear a click. If it's even slightly misaligned, many fridges will stop water flow entirely as a safety measure to prevent leaks.
The Water Line or Reservoir Is Frozen — Thaw It With a Hairdryer
If your freezer is set extremely cold, the water line running through the door or the reservoir behind the crisper drawers can freeze solid. A classic giveaway: the ice maker still works, but the dispenser doesn't. Another sign is a humming sound when you press the paddle with no water coming out — the valve is opening, but ice is blocking the path.
Use a hairdryer on a low setting to warm the line where it enters the door. Be careful around plastic parts. Once things are thawed, bump the freezer temperature up slightly to keep it from happening again.
📖 You might also like to read: Fridge Is Warm but Freezer Is Cold? Here's What's Going On
The Water Line Behind the Fridge Is Kinked or the House Pressure Is Too Low
Pull the fridge away from the wall and look at the flexible plastic tubing connecting it to the wall. These lines kink easily when the fridge gets pushed back too close. If you see a sharp bend or a flattened section, straighten it out and leave a couple of inches of clearance between the fridge and wall going forward.
Water Pressure Is Below 20 psi — Measure With the Cup Test
Refrigerators generally need at least 20 psi to work properly. A quick way to check: dispense water into a measuring cup for 20 seconds. If you get less than 8 ounces, pressure is the issue.
If your fridge is connected to a reverse osmosis system, that can actually drop the pressure too low. In that case, removing the fridge's internal filter can help compensate, since the RO system is already filtering the water.
The Saddle Valve Is Clogged With Sediment — Turn It In and Back Out
Older installations sometimes use a saddle valve — a small piercing valve that clamps onto the water line. These are notorious for clogging over time. Try turning it all the way in and then back out to clear any buildup. If the flow stays weak, a plumber can swap it for a proper ball valve connection.
The Door Switch, Dispenser Switch, or Inlet Valve Has Failed — Test Each With a Multimeter
If there's no sound at all when you press the paddle, something electrical has likely failed.
Door switch: Tests for continuity with a multimeter. No continuity when pressed means the switch is faulty and needs replacing.
Dispenser micro switch: The small switch behind the paddle should click when you press it. No click, or no continuity on the multimeter, means it needs replacing.
Water inlet valve: This is the valve that opens to let water into the fridge. If it buzzes loudly but no water comes through, or if it makes no sound despite having power, it may have failed. Hard water deposits can clog it mechanically, while the solenoid inside can burn out electrically. A continuity test will confirm it.
Brand-Specific Weak Points Worth Knowing
Samsung: Frozen water reservoirs behind the crisper drawers are a recurring complaint. After a filter change, run the dispenser for up to five minutes to purge air — Samsung models typically need longer than other brands.
Whirlpool, Maytag, and KitchenAid: These models are finicky about filter brands. Non-OEM filters frequently cause slow flow or a complete stop. Stick to genuine EveryDrop filters if you're having trouble.
Frigidaire: Water inlet valve failures and frozen lines in the freezer door are the most common complaints, particularly on side-by-side models.
GE: The bypass plug is a genuinely useful diagnostic tool. If you've misplaced yours, you can order a replacement directly from GE.
Flush 2–3 Gallons Through the Dispenser After Any Repair
Any time you replace a filter or disconnect a water line, run about 2–3 gallons through the dispenser before using the water. This clears trapped air (which causes sputtering and dribbling) and flushes loose carbon particles from a new filter. Cloudy water at first is just air bubbles — it clears up quickly.
Call a Professional If You See These Four Signs
Most dispenser issues are DIY-friendly appliance repair, but call a technician if:
Your control panel buttons are unresponsive or behaving erratically (likely a control board issue)
You smell burning or the fridge is tripping your circuit breaker
Water is pooling under the unit and you can't find the source
The low pressure is coming from your home's plumbing, not the fridge itself
In most cases, a fresh filter and a quick settings check will get your dispenser back up and running. Work through the list in order and you'll find the problem faster than you'd expect.
Need an inspection or repair for your freezer or refrigerator?
If your fridge isn’t cooling properly, is leaking water, or keeps making loud noises, the issue may be more than a simple setting or dirty coil. It could be a failing compressor, a faulty thermostat, a clogged drain line, or a bad door seal. To avoid spoiled food and bigger repair costs, it’s best to have a pro check it.
👉 Need a refrigerator diagnostic or repair? Call +18885085008 or book an expert with Fred’s Appliance Repair.
👉 Service areas: Charlotte, Raleigh, Durham, Cary, and Knoxville (North Carolina and Tennessee).

You open the fridge to grab some milk. It's lukewarm. You check the freezer — ice cream is rock solid. So the freezer works fine. But your refrigerator is not cooling at all.
Sound familiar? You're not alone. This is one of the most common appliance complaints homeowners deal with. The good news? It almost never means your fridge is dead. In most cases, it comes down to a simple airflow or defrost issue — and many of these you can fix yourself.
Let's break it down.
🛠️ Need help with freezer repair in NC or Tennessee? Call +18885085008 or book an expert with Fred’s Appliance Repair.
Why Your Freezer Works but Your Fridge Doesn't Cool
Here's something most people don't know: your fridge doesn't actually create its own cold air.
It borrows cold air from the freezer.
The freezer has evaporator coils that pull heat out of the air and chill it. A fan then pushes that cold air through a vent system into the fresh food section. So the freezer stays cold no matter what, because it sits right next to the source. But if something blocks or breaks the path between the two compartments, warm air gets trapped in the fridge.
That's the core of this problem — every time.
Start Here: The Easy Fixes for When Fridge Is Warm but Freezer (No Tools Needed)
Before assuming something is broken, check these first. You'd be surprised how often one of these is the culprit.
Check Your Air Vents
There are vents on the back wall of your freezer and inside your fridge. These are the passageways cold air travels through. If a bag of frozen peas is sitting right against them, the airflow stops.
Take 60 seconds to look. Make sure nothing is pressed up against the vents. Leave at least an inch of space around them.
Don't Overstuff the Fridge
A packed fridge looks organized. But it can actually stop air from circulating properly. Cold air needs room to move around. If the fridge is stuffed wall to wall, it won't cool evenly.
A good rule: keep your fridge about three-quarters full. That's the sweet spot for both cooling and efficiency.
Check the Temperature Settings
Someone might have bumped the dial when loading groceries. It happens more than you'd think.
Your fridge should be set to around 37°F (3°C). Your freezer should be at 0°F (-18°C). If either is off, reset it and wait a few hours before checking again.
Is the Fridge Sitting Level?
If your refrigerator tilts even slightly, the doors might not seal all the way. Warm air sneaks in constantly. Cold air leaks out. The fridge can't keep up.
Grab a spirit level and set it on top of the fridge. Adjust the front legs if needed. Most models have twist-adjustable feet at the bottom.
Mechanical Problems That Cause a Warm Fridge
If the simple fixes didn't help, something physical is likely failing. Here are the most common parts that break and cause exactly this symptom.
The Evaporator Fan Has Failed
This is the fan inside your freezer that circulates cold air. When it stops working, air stops moving — and the fridge warms up fast.
How to test it: Open the freezer door and find the door switch (usually a small button near the door frame). Press it manually. This tricks the fridge into thinking the door is closed. If you don't hear a fan running, it's likely failed or frozen in place.
A working fan motor typically shows 20–4,000 ohms on a multimeter. No reading at all? The motor is dead and needs replacing.
Signs of a failing evaporator fan:
No airflow coming from fridge vents
Grinding or squealing noise from the freezer
Silence when the compressor is running
The Air Damper Is Stuck Closed
The damper is a small motorized flap that opens to let cold air into the fridge and closes when the right temperature is reached. If it gets stuck in the closed position, no cold air gets through — even if the fan is running perfectly.
You can often hear the fan working but still feel warm air in the fridge. That's a classic sign of a stuck air damper. Inspect it for physical damage or ice buildup. If the motor is dead, the whole assembly needs to be replaced. It's usually a straightforward part swap.
Dirty Condenser Coils
These coils sit on the back or bottom of your fridge and release heat to the outside. Over time, they collect dust, pet hair, and lint. When they're clogged, the whole system works harder and less efficiently.
The freezer stays cold because it's the priority in the cooling cycle. But the fridge starts to warm up as the system struggles to keep up.
Fix: Unplug the fridge. Pull it away from the wall. Vacuum the coils thoroughly. Do this every 6–12 months and you'll prevent a lot of headaches.
The Defrost System: When Ice Becomes the Problem
Most modern fridges are "frost-free." That means they run an automatic defrost cycle to melt ice off the evaporator coils every few hours. If that system fails, ice slowly builds up over days or weeks — until the coils are completely frozen over.
When that happens, air can't flow through them at all. Your freezer still feels cold, but nothing reaches the fridge.
How to Check for This?
Remove the back panel inside your freezer. If you see a thick layer of frost or ice covering the coils, the defrost system has failed.
What breaks in the defrost system:
Defrost heater — the element that melts the frost
Defrost thermostat — monitors coil temperature and triggers the heater
Defrost timer or control board — decides when to run the cycle
The Quick Test: Manual Defrost
Unplug your fridge and leave both doors open for 24–48 hours. Put towels on the floor to catch the water. After it's fully thawed, plug it back in.
If the fridge cools normally again, you've confirmed the defrost system is the problem. The fix is temporary — the ice will come back in a few days. But now you know exactly which part to replace.
📖 Learn how to defrost your freezer
Brand-Specific Issues Worth Knowing
Different brands have known weak points for this exact problem. If your fridge isn't cooling but the freezer is fine, check if your brand has a common culprit.
Samsung Refrigerators
Samsung uses a "Twin Cooling" system with separate evaporators for the fridge and freezer. The fridge evaporator coils are prone to freezing over when the defrost sensor or heater fails.
Watch for error codes like 21E (fan error) or 22E/23E/25E (damper/sensor issues). The damper on many Samsung models also freezes shut due to humidity issues in the design.
LG Refrigerators
LG French door models are very sensitive to where food is placed. Items too close to the rear vents can disrupt airflow entirely. Some LG models have also needed control board software updates to fix defrost logic errors — worth checking with LG support if your model is affected.
Whirlpool, KitchenAid, and Maytag
For these related brands, the air damper assembly is the most common hardware failure when the fridge is warm but the freezer is cold. The damper motor breaks and the door stays permanently shut. Listen for chirping or whirring noises from the fan — that often shows up days before the fan fully fails.
GE Refrigerators
GE models frequently have thermistor failures. The temperature sensor stops sending accurate readings to the control board. The board thinks the fridge is already cold, so it never opens the damper. Replacing the thermistor is usually a quick and affordable fix.
Other Things to Check
The Door Gasket Might Be Leaking
The rubber seal around your fridge door keeps cold air in. If it's torn, warped, or just dirty, warm air leaks in constantly.
Quick test: Close the fridge door on a dollar bill. Try to pull it out. If it slides out easily with no resistance, the seal is weak and needs to be replaced or at least cleaned with warm soapy water.
The Thermistor Might Be Faulty
The thermistor is a small sensor that reads the fridge temperature and tells the control board what to do. If it's giving wrong readings, the system might think it's already cold enough — and never signal the fan or damper to run.
You can test a thermistor by placing it in ice water and checking its resistance with a multimeter. The reading should drop noticeably as it cools. If it stays the same, it's broken.
When to Call a Repair Tech
Most of the fixes above are DIY-friendly. But some situations need a professional.
Call a technician if:
The compressor is making loud buzzing or clicking sounds
You see oily black residue near the back of the fridge (possible refrigerant leak)
You suspect the main control board is faulty
Refrigerant is a regulated substance — you can't legally handle it yourself. And misdiagnosing a control board can cost you hundreds on the wrong part.
Quick Recap
Problem | What to do |
|---|---|
Blocked vents | Rearrange food, leave 1 inch clearance |
Overpacked fridge | Remove items, aim for ¾ full |
Wrong temperature | Reset to 37°F fridge / 0°F freezer |
Unlevel fridge | Adjust feet, check door seal |
Evaporator fan dead | Test with door switch, replace motor |
Damper stuck closed | Inspect and replace assembly |
Dirty condenser coils | Vacuum every 6–12 months |
Iced-over evaporator | Manual defrost, then replace defrost component |
Bad thermistor | Test in ice water, replace if needed |
Torn door gasket | Dollar bill test, clean or replace |
Need an inspection or repair for your freezer or refrigerator?
If your fridge isn’t cooling properly, is leaking water, or keeps making loud noises, the issue may be more than a simple setting or dirty coil. It could be a failing compressor, a faulty thermostat, a clogged drain line, or a bad door seal. To avoid spoiled food and bigger repair costs, it’s best to have a pro check it.
👉 Need a refrigerator diagnostic or repair? Call +18885085008 or book an expert with Fred’s Appliance Repair.
👉 Service areas: Charlotte, Raleigh, Durham, Cary, and Knoxville (North Carolina and Tennessee).

While a leaking washer is frustrating, it is a very common issue that often has a simple explanation. In many cases, you don't even need a toolkit to solve it—just a bit of detective work and some basic maintenance.
This guide will walk you through how to identify the source of the water, common reasons for those puddles, and the quick DIY fixes you can try before calling in the professionals.
🛠️ Need a washing machine diagnostic or repair? Call +18885085008 or book an expert with Fred’s Appliance Repair.
How to Diagnose Where Water is Coming From?
To diagnose the exact source of a water leak in your washing machine, you can use a combination of visual tests, timing observations, and location-based inspections.
⚠️ Safety and Immediate Action ⚠️
Before you even touch the puddle, you must ensure your environment is safe. First, unplug the washing machine from the power outlet. If the plug is wet or hard to reach safely, turn off the power at your circuit breaker instead.
Next, you need to stop the flow of water. Locate the shut-off valves on the wall behind your machine and turn them off. This prevents any more water from entering the unit while you investigate. Finally, grab some old towels and a bucket to soak up the standing water. Moisture left on the floor can lead to mold or damage to your subflooring, so getting it dry quickly is essential.
General Diagnostic Techniques
Method 1: The Paper Towel Test. Place paper towels around and under the machine to help pinpoint the exact point where water first appears.
Method 2: Running a Test Cycle. Perform a quick wash or small load test with no clothing or detergent to observe when the leaking occurs during the cycle.
Method 3: Inspecting the Exterior. Pull the machine away from the wall to get a clear view of the back and underneath, ensuring you unplug the power and turn off the water valves first for safety.
Method 4: Look for washer error codes. Some brands displays error codes when water is leaking. For example, Bosch displays E15 error code indicating water has leaked into the base pan.
Diagnosing by Location
Front of Machine: If water is coming from the front, it is most likely the door seal or gasket (on front-loaders). Inspect the seal for tears, gaps, or trapped debris. Also, check if the detergent drawer is clogged or leaking due to limescale buildup.
Back of Machine: Leaks at the back typically indicate an issue with the water supply (inlet) hoses or the drain hose. Check for loose connections, cracks, bulges, or worn-out rubber washers.
Underneath/Bottom: Pooling water directly under the machine often suggests a damaged water pump, a cracked drain pipe, or a faulty tub seal. If you see oil on the floor, it indicates a transmission problem rather than a standard water leak.
Diagnosing by Cycle Timing
Leaking while OFF: If the machine drips even when not in use, the water inlet valve is likely faulty.
Leaking during FILL or AGITATION: This often points to a damaged tub seal or a malfunctioning water level switch.
Leaking during SPIN: Leaks during this stage may be caused by an unleveled machine, a clogged water pump, or a blocked drain hose.
Leaking during DRAIN: This is frequently caused by loose hose clamps, a broken drain pump, or a hole in the drain hose.
📖 You might also like to read: Washing Machine Won’t Drain: Causes, Symptoms, and How to Fix
Other Factors to Check
Leveling: Use a level to ensure the machine is balanced; an uneven machine can cause water to overflow or leak from the door seal.
Excessive Suds: Look for soap bubbles; using too much detergent or non-HE soap can cause suds to push water out of the seals or dispenser.
📖 You might also like to read: Washing Machine Error Codes: Meaning, Causes, and Fixes (Complete Guide)
Common Reasons of Why Washer Leaking
1. Cracked Hoses and Connections
Statistically, the most common reason for a washing machine leak is a problem with the hoses. Your machine has two types: inlet hoses that bring fresh water in, and a drain hose that carries dirty water away.
The Issues: Over time, rubber hoses can become brittle, crack, or develop bulges under pressure. Sometimes, the constant vibration of the machine during the spin cycle simply causes the connections at the back to wiggle loose.
The DIY Fix: Pull the machine away from the wall to get a good look at the back. Check the hot and cold water inlet connections. If they are wet, try tightening them by hand. Avoid using heavy tools like wrenches unless absolutely necessary, as overtightening can crack the plastic fittings.
If you see a crack or a bulge in the hose itself, it needs to be replaced immediately. A good rule of thumb is to replace your rubber hoses every three to five years, even if they look fine, to prevent a sudden burst.
2. Worn/damaged Door Seal (Gasket)
If you own a front-loading machine and see water trickling down the front panel, your door seal—also known as the gasket—is likely the culprit.
The Issues: This large rubber ring is what keeps the water inside while the drum spins. However, it is a magnet for debris. Hair, lint, or even a forgotten bobby pin can get stuck in the folds, creating a tiny gap that allows water to escape. Over time, soap residue can also build up, preventing a tight seal, or the rubber itself can develop small tears.
The DIY Fix: Open the door and inspect the entire seal. Gently pull back the rubber folds to look for coins, buttons, or hair. Clean the seal thoroughly using a damp cloth and a mixture of vinegar and water or a mild bleach solution to remove mold and soap scum. If you find a visible rip or tear in the rubber, the seal will need to be replaced by a professional, as it can no longer hold pressure.
3. The Drain Pump Filter is Clogged
Many modern machines have a small access door at the bottom front. Behind this door sits the drain pump filter, designed to catch "treasures" before they reach the pump.
The Issues: If this filter becomes completely clogged with lint or small objects, water can back up and leak out from the filter housing. This is most likely to happen during the drain or spin cycles.
The DIY Fix: Place a shallow tray or a thick towel under the access door, as some water will always spill out when you open it. Unscrew the filter and clear out any debris. Rinse it under the tap and screw it back in, ensuring it is tightened correctly by hand to prevent a new leak from forming right at the filter.
4. Overload or Too Much Detergent
Sometimes, the "leak" isn't caused by a broken part at all, but rather by how the machine is being used.
The Issues:
Excessive Suds: Using too much detergent—or using regular detergent in a High-Efficiency (HE) machine—creates a "suds lock" situation. The massive amount of foam can force water out of the dispenser drawer or the overflow tubes.
Overloading: Cramming too many clothes into the drum can cause water to splash over the top of the tub or put excessive pressure on the door seal. It can also lead to an unbalanced load, which makes the machine vibrate violently, potentially loosening internal connections or causing it to "walk" across the floor.
The DIY Fix: Always follow the manufacturer's guidelines for detergent amounts. If you have a water softener, you actually need less detergent than the bottle recommends. To test if suds are your problem, run a cycle with no clothes and no soap; if no water appears, you’ve likely just been using too much detergent. Additionally, give your clothes enough room to move freely; the drum should never be tightly packed.
5. Improper Use (Detergent Overuse & Overloading)
If you notice water running down the front of the machine specifically when it first starts filling, the dispenser drawer is the place to look.
The Issues: Detergent and fabric softener can build up over time, turning into a thick, waxy residue that blocks the water jets. If the water can't flow into the drum properly, it will back up and spill out the front of the drawer.
The DIY Fix: Most drawers can be completely removed by pressing a small tab. Take it to your sink and scrub it with warm, soapy water and an old toothbrush. Don't forget to wipe out the housing where the drawer sits, as clogs can happen there too.
6. Improper Leveling (Rocking/tilting)
A washing machine that is tilted or rocking can experience unexpected leaks.
The Issues: If the machine isn't level, water may not drain correctly, or it might slosh out of the tub during the agitation phase.
The DIY Fix: Place a spirit level on top of the machine. If it's tilted, lean the machine back and adjust the leveling feet by screwing them in or out until the unit sits perfectly flat and doesn't rock when you push on the corners.
When Should You Call a Professional?
While the steps above solve a huge percentage of washer leaks, some problems are buried deep inside the machine's mechanics. You should put down the tools and call a licensed technician if:
You see oil: If the puddle on your floor is oily or brownish, it usually indicates a transmission failure, which is a complex mechanical repair.
The Leak is Internal: If you’ve checked the hoses, filters, and seals and the water is still coming from deep underneath, you may have a cracked outer tub or a faulty internal pump.
Water drips while the machine is off: This often points to a failing water inlet valve at the back of the machine, which requires internal part replacement.
Persistent Bottom Leaks: Constant puddles directly under the center of the machine often mean the tub seal has failed, requiring significant disassembly.
Need an inspection or repair for your washer?
👉 Need a washing machine diagnostic or repair? Call +18885085008 or book an expert with Fred’s Appliance Repair.
👉 Service areas: Charlotte, Raleigh, Durham, Cary, and Knoxville (North Carolina and Tennessee).
